Connect your Domain to External Webhosting Providers
Print
Before starting, make sure that your domain's Nameservers are pointing to Crucial. The easiest way to do this is to check your domain on ozdns.com.au
You can find Crucial Nameservers here.
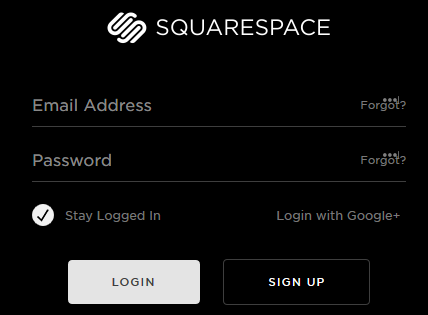
Step 1 - Log in to https://www.squarespace.com/login
Next click on SETTINGS
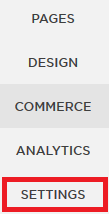
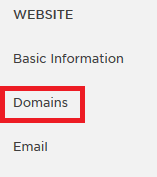
Then click on Domains
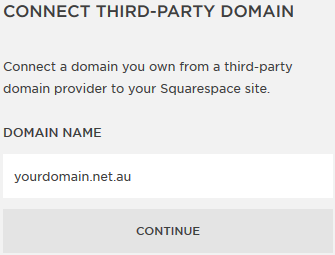
Now click on CONNECT A THIRD-PARTY DOMAIN

Step 2 - Enter your domain name and hit CONTINUE
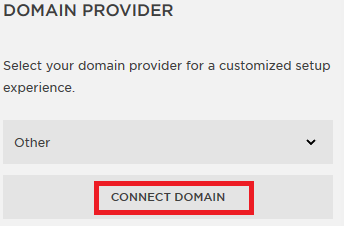
Select Other as your domain provider and hit CONNECT DOMAIN
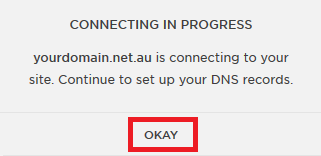
Click OKAY on the next screen
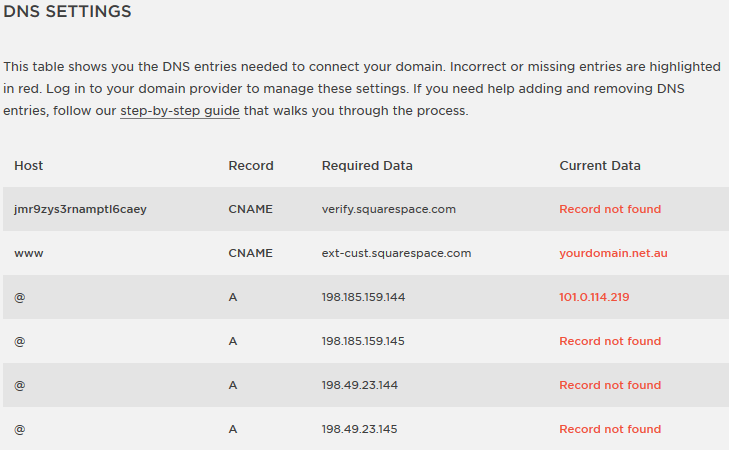
Here is the important information, your DNS settings.
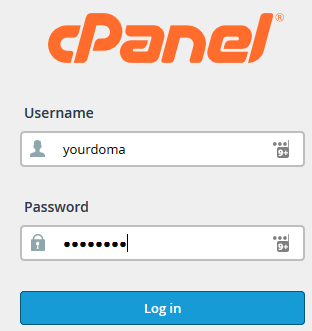
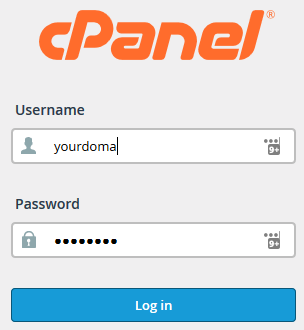
Step 3 - Keep that page open. Now open another window and log in to cPanel (click here for a guide).
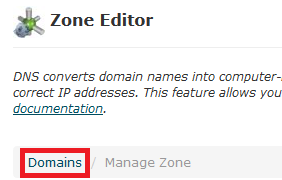
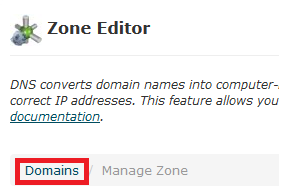
Find the Zone Editor and log in

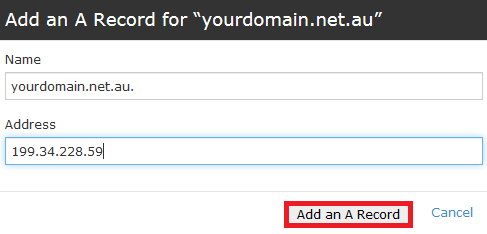
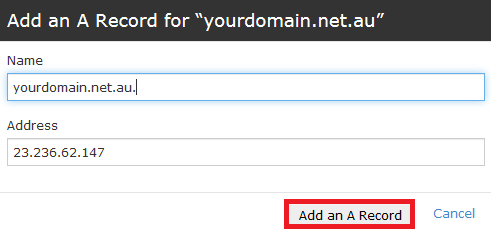
Step 4 - For the first record, you'll want to add an A Record. Open the Squarespace page for the details of the record, then go back to the Zone Editor and click on the menu option for A Record.

Add the Host (@ just means the domain name, in this example: yourdomain.net.au) and the Required Data into the Address field.
Note: You do not need to add the TTL as the server sets this automatically.
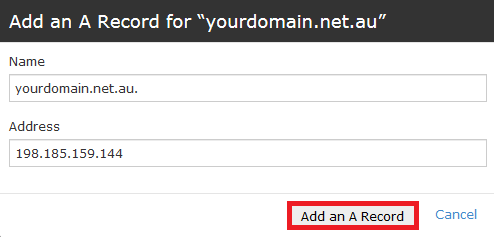
Now go ahead and do this for the other 3 A Records.
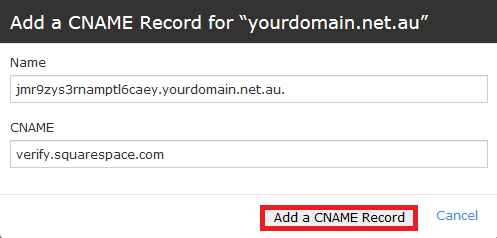
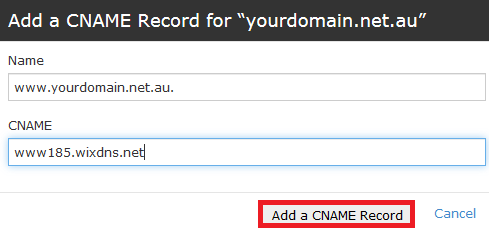
Step 5 - Next, add the first CNAME Record. Make sure to open the Squarespace page for the record.

Note: The domain name will automatically be added to the Host record. This is fine and won't have any negative effects. Also, you do not need to add the TTL as the server sets this automatically.
Step 6 - Click on Manage

Look for an A Record for your domain (ignore subdomains like cpanel.yourdomain mail.yourdomain etc) that does not match the 4 records you added previously. Delete this.

Now look for the www CNAME record (www.yourdomain.net.au in this case) and delete that record.

Step 7 - Scroll up to the top of the screen and click on Domains

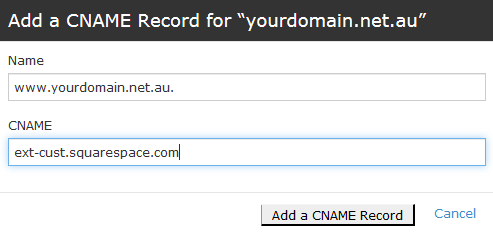
Now add the last CNAME record listed in on the Squarespace page.
Note: cPanel will automatically add your domain name to the www. Also, you do not need to add a TTL as the server sets this automatically.
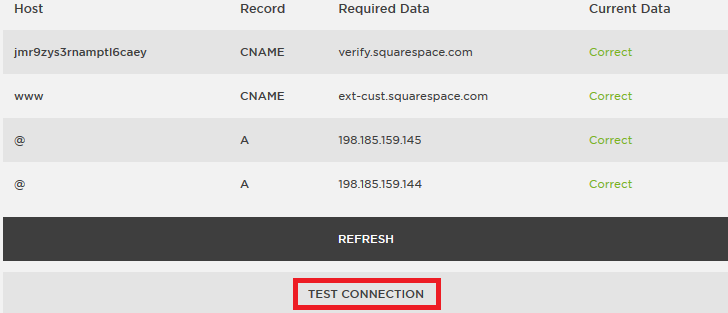
Step 10 - Back to Squarespace. Hit refresh every few minutes. The DNS settings are normally live within 60min but they can take up to 24hrs. Once all the fields are marked in green as Correct, hit TEST CONNECTION and your site is ready and pointed to Squarespace.
Should you have any problems with your Squarespace site, you can find support from Squarespace here: https://support.squarespace.com/hc/en-us/requests/new
Step 1 - Log into your Weebly account and get your DNS records: https://hc.weebly.com/hc/en-us/articles/201372693-How-to-Use-a-Domain-You-Purchased-Elsewhere
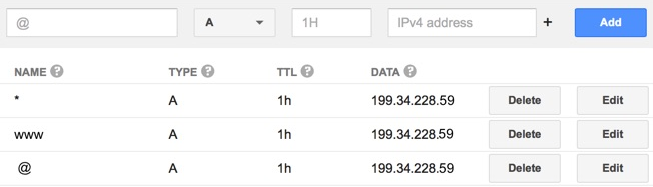
The records should look something like this
Step 2 - To edit your DNS records, log in to cPanel (click here for a guide). Make sure you keep the Weebly page with the DNS records open
Now click on the Zone Editor icon

Step 3 - Click on Manage

Next, you want to find and delete these 2 records:
(1)

(2)

Once that's done, scroll up and click on Domains
Step 4 - Click on the A Record option to add the 2 records fom the Weebly page

Now you can add the records. Note that @ just refers to the domain name. Do not add the * record, as it's not required. Also, you do not need to add the TTL as the server sets this automatically.
(1)
(2)
Note that with Weebly DNS records propagate every 24hrs. This means it may take up to 24hrs after the changes are made for them to become live and for your domain to correctly display your website with Weebly.
If you need help with your Weebly website you can find their help articles here: https://hc.weebly.com/hc/en-us
You can also find their support contact here: https://hc.weebly.com/hc/en-us/articles/204197083-Contact-Weebly-via-Phone-Live-Chat-or-a-Support-Ticket
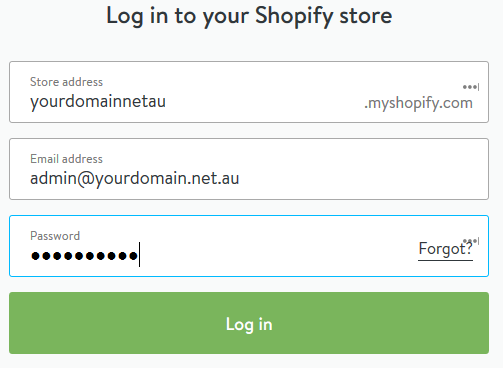
Step 1 - Go to shopify.com and click Log in in the top right

Add your login details and click Log in
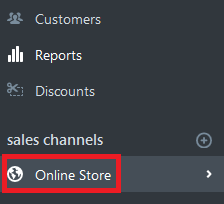
Click on Online Store
Click on Domains

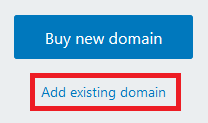
Step 2 - Click Add existing domain
Type in your domain name and click Add Domain

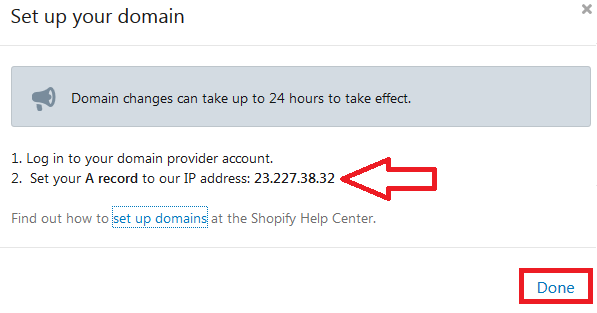
Take note of the A record and hit Done
Step 3 - Log in to cPanel (click here for a guide) and click on the Zone Editor
NOTE 1: Make sure you do this in a new window and leave the Shopify window open.
NOTE 2: The next few steps are only valid if you're using Digital Pacific's nameservers. You can confirm this by testing your domain at http://ozdns.com.au/. Our nameservers start with ns1.digitalpacific.com.au or ns1.auserver.com.au. If you're not using our nameservers, you'll need to contact your registrar/nameserver provider for instructions on editing DNS records
Click on the Zone Editor

Now click on Manage

Now you need to find and delete these 2 records
(1)

(2)

Once that's done, scroll up to the top and click Domains

Step 4 - Click on A Record

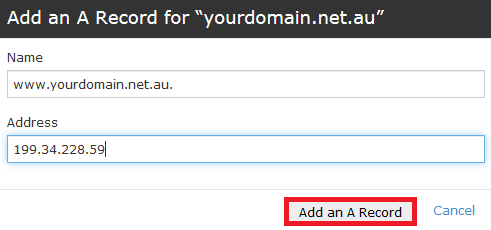
Add the A Record noted in the Shopify windows. Remember that Name will be your domain name (without www). Hit Add an A Record when done.

Now go back to the Shopify window and click Complete Setup

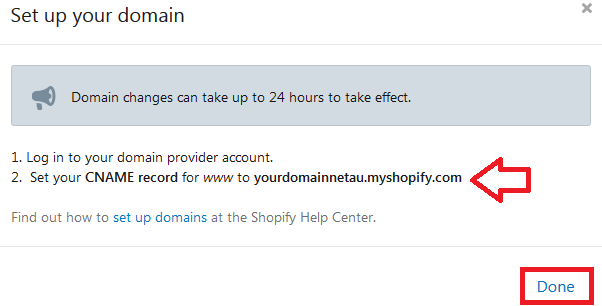
Step 5 - Take note of the CNAME record requested from Spotify (this may be shops.myshopify.com)
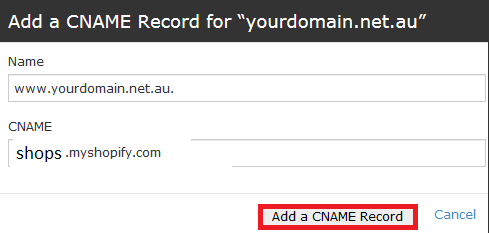
In cPanel, click on CNAME and add the record

Add the record and hit Add a CNAME Record (usually shops.myshopify.com).
Note that cPanel will automatically add your domain after www. This is fine.
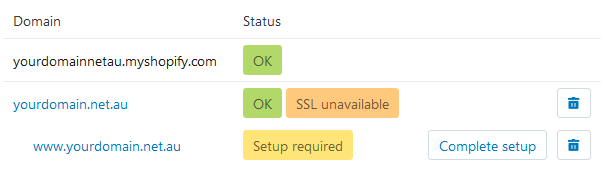
Go back to the Shopify window. You'll know when a record has propagated when you see a green OK next to it. Once both records say OK your domain will be pointing correctly to Spotify. You can hit f5 on your keyboard to refresh the page
Step 6 - Go back to the Shopify window. You'll know when a record has propagated when you see a green OK next to it. Once both records say OK your domain will be pointing correctly to Spotify. You can hit f5 on your keyboard to refresh the page. Note that records normally take between 15min to 4hrs to propagate, but in rare circumstances can take up to 24hrs.
If you need more help with your Shopify site please visit https://support.shopify.com
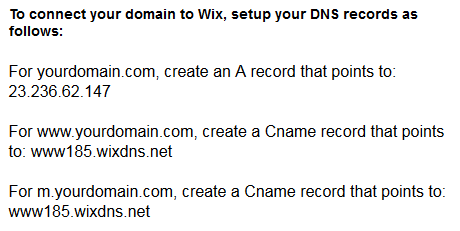
The page should have the DNS records which look like this:
Step 2 - Leave that page open, then open a new page or tab and log in to cPanel (click here for a guide) Click on the Zone Editor

Now click on Manage

You need to find and delete these 2 records:
(1)

(2)

Next, scroll up to the top and click on Domains
Step 3 - Click on A Record to add the first record

Add the record and click ADD an A Record. Note that a . (fullstop) will automatically be added to the end, this is fine.
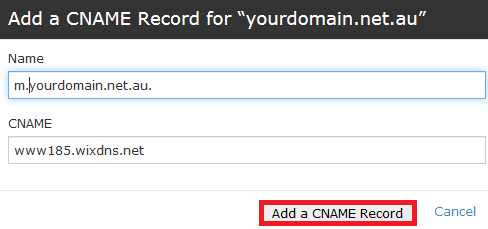
Step 4 - click on CNAME Record

Add the record and click Add a CNAME Record
Now repeat that and add the last record.
Once you've added all of the DNS records, you will need to wait up to 4hrs for the DNS records to propagate and your site should be pointing correctly to Wix.
If you're having trouble with your Wix site you can find support here: https://www.wix.com/support/html5/
- 16-08-2018 09:34
Connect your Domain to External Webhosting Providers
Before starting, make sure that your domain's Nameservers are pointing to Crucial. The easiest way to do this is to check your domain on ozdns.com.au
You can find Crucial Nameservers here.
Sqaurespace
Step 1 - Log in to https://www.squarespace.com/login
Next click on SETTINGS
Then click on Domains
Now click on CONNECT A THIRD-PARTY DOMAIN
Step 2 - Enter your domain name and hit CONTINUE
Select Other as your domain provider and hit CONNECT DOMAIN
Click OKAY on the next screen
Here is the important information, your DNS settings.
Step 3 - Keep that page open. Now open another window and log in to cPanel (click here for a guide).
Find the Zone Editor and log in
Step 4 - For the first record, you'll want to add an A Record. Open the Squarespace page for the details of the record, then go back to the Zone Editor and click on the menu option for A Record.
Add the Host (@ just means the domain name, in this example: yourdomain.net.au) and the Required Data into the Address field.
Note: You do not need to add the TTL as the server sets this automatically.
Now go ahead and do this for the other 3 A Records.
Step 5 - Next, add the first CNAME Record. Make sure to open the Squarespace page for the record.
Note: The domain name will automatically be added to the Host record. This is fine and won't have any negative effects. Also, you do not need to add the TTL as the server sets this automatically.
Step 6 - Click on Manage
Look for an A Record for your domain (ignore subdomains like cpanel.yourdomain mail.yourdomain etc) that does not match the 4 records you added previously. Delete this.
Now look for the www CNAME record (www.yourdomain.net.au in this case) and delete that record.
Step 7 - Scroll up to the top of the screen and click on Domains
Now add the last CNAME record listed in on the Squarespace page.
Note: cPanel will automatically add your domain name to the www. Also, you do not need to add a TTL as the server sets this automatically.
Step 10 - Back to Squarespace. Hit refresh every few minutes. The DNS settings are normally live within 60min but they can take up to 24hrs. Once all the fields are marked in green as Correct, hit TEST CONNECTION and your site is ready and pointed to Squarespace.
Should you have any problems with your Squarespace site, you can find support from Squarespace here: https://support.squarespace.com/hc/en-us/requests/new
Weebly
Step 1 - Log into your Weebly account and get your DNS records: https://hc.weebly.com/hc/en-us/articles/201372693-How-to-Use-a-Domain-You-Purchased-Elsewhere
The records should look something like this
Step 2 - To edit your DNS records, log in to cPanel (click here for a guide). Make sure you keep the Weebly page with the DNS records open
Now click on the Zone Editor icon
Step 3 - Click on Manage
Next, you want to find and delete these 2 records:
(1)
(2)
Once that's done, scroll up and click on Domains
Step 4 - Click on the A Record option to add the 2 records fom the Weebly page
Now you can add the records. Note that @ just refers to the domain name. Do not add the * record, as it's not required. Also, you do not need to add the TTL as the server sets this automatically.
(1)
(2)
Note that with Weebly DNS records propagate every 24hrs. This means it may take up to 24hrs after the changes are made for them to become live and for your domain to correctly display your website with Weebly.
If you need help with your Weebly website you can find their help articles here: https://hc.weebly.com/hc/en-us
You can also find their support contact here: https://hc.weebly.com/hc/en-us/articles/204197083-Contact-Weebly-via-Phone-Live-Chat-or-a-Support-Ticket
Shopify
Step 1 - Go to shopify.com and click Log in in the top right
Add your login details and click Log in
Click on Online Store
Click on Domains
Step 2 - Click Add existing domain
Type in your domain name and click Add Domain
Take note of the A record and hit Done
Step 3 - Log in to cPanel (click here for a guide) and click on the Zone Editor
NOTE 1: Make sure you do this in a new window and leave the Shopify window open.
NOTE 2: The next few steps are only valid if you're using Digital Pacific's nameservers. You can confirm this by testing your domain at http://ozdns.com.au/. Our nameservers start with ns1.digitalpacific.com.au or ns1.auserver.com.au. If you're not using our nameservers, you'll need to contact your registrar/nameserver provider for instructions on editing DNS records
Click on the Zone Editor
Now click on Manage
Now you need to find and delete these 2 records
(1)
(2)
Once that's done, scroll up to the top and click Domains
Step 4 - Click on A Record
Add the A Record noted in the Shopify windows. Remember that Name will be your domain name (without www). Hit Add an A Record when done.
Now go back to the Shopify window and click Complete Setup
Step 5 - Take note of the CNAME record requested from Spotify (this may be shops.myshopify.com)
In cPanel, click on CNAME and add the record
Add the record and hit Add a CNAME Record (usually shops.myshopify.com).
Note that cPanel will automatically add your domain after www. This is fine.
Go back to the Shopify window. You'll know when a record has propagated when you see a green OK next to it. Once both records say OK your domain will be pointing correctly to Spotify. You can hit f5 on your keyboard to refresh the page
Step 6 - Go back to the Shopify window. You'll know when a record has propagated when you see a green OK next to it. Once both records say OK your domain will be pointing correctly to Spotify. You can hit f5 on your keyboard to refresh the page. Note that records normally take between 15min to 4hrs to propagate, but in rare circumstances can take up to 24hrs.
If you need more help with your Shopify site please visit https://support.shopify.com
Wix
Step 1 - The first thing you need to do is to find the Wix DNS records. Log into your Wix account then click on this link: https://www.wix.com/support/html5/article/domain-pointing-recordsThe page should have the DNS records which look like this:
Step 2 - Leave that page open, then open a new page or tab and log in to cPanel (click here for a guide) Click on the Zone Editor
Now click on Manage
You need to find and delete these 2 records:
(1)
(2)
Next, scroll up to the top and click on Domains
Step 3 - Click on A Record to add the first record
Add the record and click ADD an A Record. Note that a . (fullstop) will automatically be added to the end, this is fine.
Step 4 - click on CNAME Record
Add the record and click Add a CNAME Record
Now repeat that and add the last record.
Once you've added all of the DNS records, you will need to wait up to 4hrs for the DNS records to propagate and your site should be pointing correctly to Wix.
If you're having trouble with your Wix site you can find support here: https://www.wix.com/support/html5/
Related Articles
© Crucial